Automatic Windows Authentication
The automatic Windows authentication feature (Single Sign On) makes it possible for the user to access the WebClient without requiring manual login. The domain login which was already performed is taken and transferred to the WebClient automatically. The user simply needs to open the Internet browser to be able to see his own settings or print jobs.
To use automatic authentication, the server running the WindowsAuthService must be a domain member.
The WebClient must be called with the same hostname as the WindowsAuthService is running (usually fully qualified). IP address does not work.
The Windows Authentication Service (WindowsAuthService) is required for an automatic Windows login (Single Sign On, SSO). Its log file is Logs\WindowsAuthService.log.
To use automatic Windows authentication, enable the Windows option (Single Sign On) in the authentication settings, see Set authentication methods.
- This requires the WindowsAuthService to be run under a domain user that belongs to the domain against which the check is to be made. This domain user must be added to the IIS_IUSRS group.
The settings for IIS are made by the installer. Check whether these have been set successfully:
- Open Internet Information Services Manager
- Select Sites > Default Web Site > WindowsAuthService and open Authentication. The following authentication methods must be enabled or disabled here:
- Anonymous Authentication: Disabled
- Windows Authentication: Enabled
This setting can only be made on the WindowsAuth Service (at the location specified above).
This setting can help with SSO problems that may occur when using Microsoft Internet Explorer or Google Chrome. The settings below prevent automatic negotiation of the authentication method so that NTLM is always used:
- Open Internet Information Services Manager
- Select Sites > Default Web Site > WindowsAuthService and open the Configuration Editor.
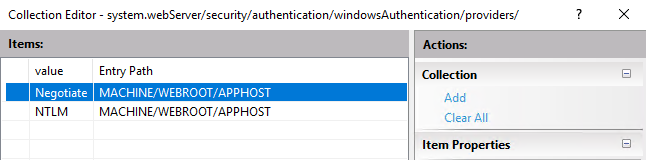
- Open the system.webServer/security/authentication/windowsAuthentication settings page.
- Click on ... in the providers line.
- Remove the line with the value: Negotiate and entry path MACHINE/WEBROOT/APPHOST
- Save the settings and restart the application pool for WindowsAuthService.
The automatic Windows authentication is only executed by Windows on pages that belong to the local Intranet area (otherwise a browser-specific input window for authentication appears). You might need to add the URL to the local Intranet zone (on each computer on which you want to run Automatic Windows Authentication).
- Open Internet Settings > Security tab
- Select Local Intranet
- Click Sites > Advanced.
- Specify the URLs you want to allow (you can also add all servers of a domain with *.domain.com, for example) and click Add.
Different settings are required depending on the browser used. Below are examples of the settings for some common browsers.
When using Google Chrome, no browser settings are required.
If you are using Mozilla Firefox, the web page to which authentication is to be performed must be explicitly specified (otherwise a browser-specific input window for authentication will appear):
- Open Firefox and enter about:config in the address bar.
- Under the item network.automatic-ntlm-auth.trusted-uris enter the web address of the web server (e.g. http://server.domain.com).
- Restart the browser.
Turn off the Compatibility View of Internet Explorer:
- Settings > Compatibility View Settings
- Show Intranet Sites in Compatibility View must be disabled.
Please note that Internet Explorer is not recommended for use with IQ4docs.
It is important that the call of the WebClient and the URL of the WindowsAuthService have the same hostname (e.g. hostname or hostname.domain.com), see also System Areas.