Printer Driver Installation
Before installing the printer driver, first decide how the print data is to be transmitted. This can be Raw, LPR or IPP (only IPP makes it possible to encrypt the data stream from the workstation). The procedures for installing Raw, LPR or IPP differ fundamentally.
When installing a central printer driver for the IQ4docs system, remember that it is not clear in advance on which device the print will be output. The user has the possibility to pick up the print at any device using print@me. Consequently, a driver must be installed that covers the setting options of the device with the best features (e.g. stapling, A3 printing, etc.). It is also possible to use a single driver for multiple device manufacturers in IQ4docs. More information is available at SingleDriver multi-brand technology.
Always use the recommended universal printer drivers with PCL6 for this. Special drivers with special functions must be avoided under all circumstances. Even SingleDriver multi-brand technology cannot always guarantee perfect printing.
Do not use a universal driver that requires an input when printing (e.g. selecting a device).
To make it possible for the PrintService (on the IQ4docs server) to accept the print job on port 631, the PrintService installer makes a binding entry for port 631 in the default web site. You can check this by clicking Default Web Site in the IIS Manager and then clicking Bindings... in the Actions section.
A binding for port 443 is available for encrypted transmission. The certificate used must still be set in it.
IPP printing is set on the server to a maximum size of approximately 2 GB per print job. You can adjust these values in IIS.
You can set the maximum size of a request (including IPP print) in IIS. To do so, two values must be adapted using the configuration editor of the website:
- Open the IIS Manager.
- Click on the Default Web Site web page.
- Open the Configuration Editor in the right-hand area.
- In the section system.webServer/security/requestFiltering, set the value requestLimits/maxAllowedContentLength in bytes (IQ4docs default value: 2147483648)
- In the section system.web/httpRuntime, set the value maxRequestLength in kilobytes (IQ4docs default value: 2097151)
First install the Windows feature Internet Print Services (Internet Print Client on the server operating system) on each client computer. Then restart the spooler service or the entire computer (even if this is not required by the feature installation).
Set up a printer using the Windows settings. Go to Devices > Printers and Scanners and select Add Printer or Scanner. After Windows searches for a device for a moment, click The printer you want is not listed.
Now select the option Select shared printer by name.
When printing via IPP, specify a URL to connect to the server.

|
Specify the URL to the IPP port of your IQ4docs installation and specify the hostname of the IQ4docs server (i.e. of the PrintService) and a queue name (default). The queue name is specified in IQ4docs in the print input, see Connecting PrintSpooler with Workflow.
|
|
|
Specify the URL to the IPP port of your IQ4docs installation and enter the hostname of the IQ4docs server (that is, the PrintService), the GUID of your client (for example, cf992178-4bd6-431c-b815-b9d734d0ded3), and a queue name (default). The queue name is specified in IQ4docs in the print input, see Connecting PrintSpooler with Workflow.
|
In the next step, when the connection is established, a window for installing the printer driver will open.
Note that for encrypted transmission of a print job, the certificate used on the server must be entered in the certificate memory under Trusted Root Certification Authorities on the client computer that sends the print job.
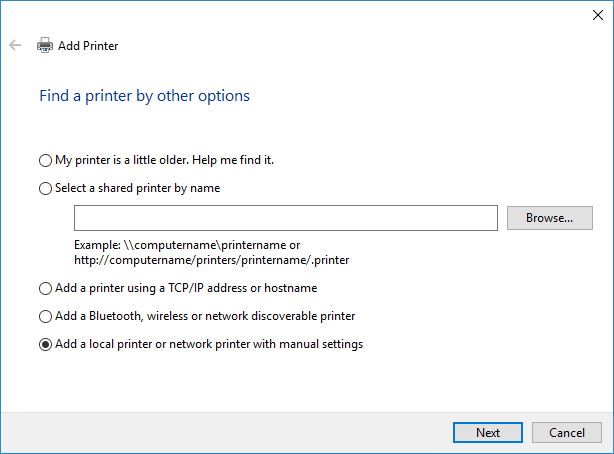
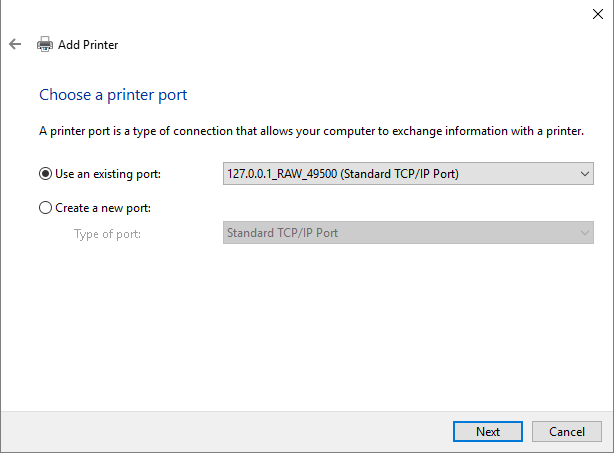
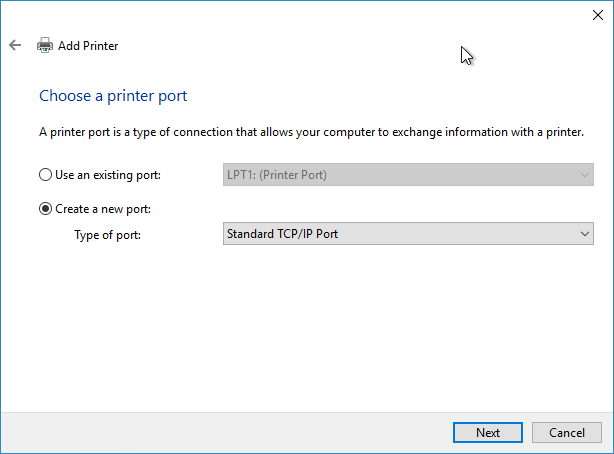
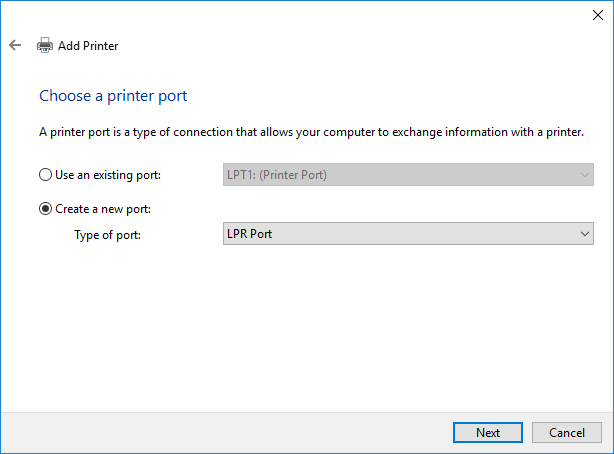
There are several ways to configure a printer driver with a TCP/IP connection. A variant under Windows 10 is described below.
By default, LPR printer names must not exceed 31 characters and must not contain special characters. Use the localservice.config of the PrintService to specify separators and the character before the value of the direct printer:
<add key="LprSplitChar" value="_" />
<add key="LprValueChar" value="-" />
Resulting examples for the IP connection with the LPR protocol:
Standard_DP-192.168.1.196
Standard_DP-printer073
direct_print_DP-printer15
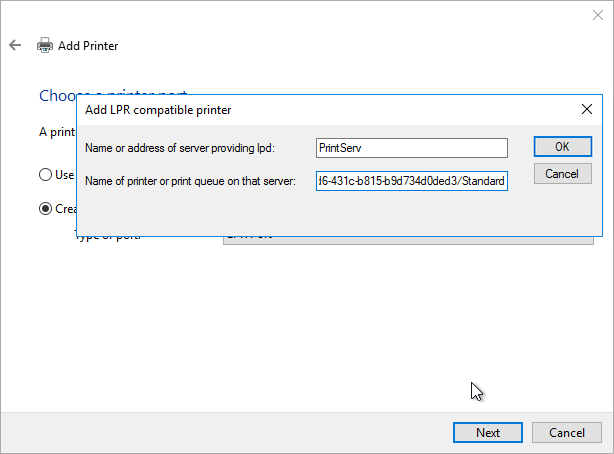
In order to capture longer names and special characters, it is mandatory to install the Windows feature Print and document services > LPR port monitor and create the port using it.
- Set up a printer using the Windows settings. Go to Devices > Printers and Scanners and select Add Printer or Scanner. After Windows searches for a device for a moment, click The printer you want is not listed.
|
|
If you are performing a standard installation on the server where IQ4docs is installed, you can simply select the printer port. If installing on a different server
|
The default printer ports for LPR and RAW have already been created by the installer.
|
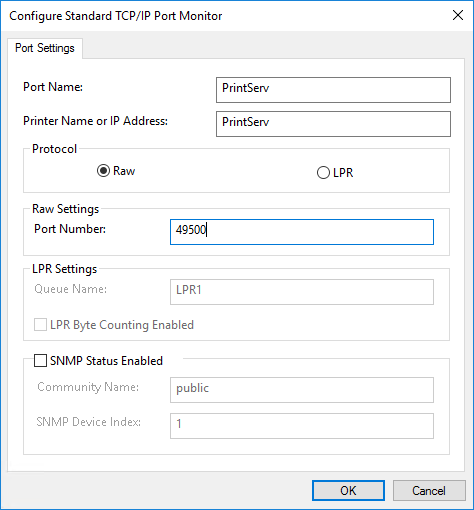
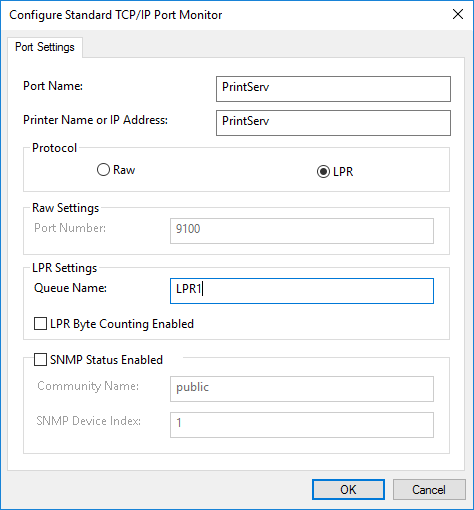
You can create a printer port for the RAW and LPR transmission protocols.
In a standard installation, a TCP/IP port is created for RAW and LPR connections.
|
|
|
|
|
|
|
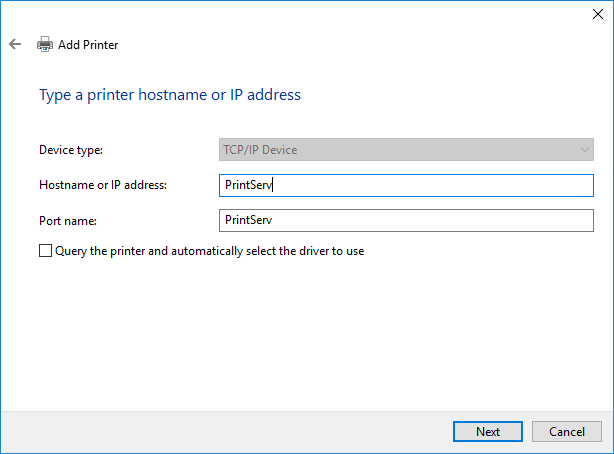
[Queue Name]/DP=[Printer hostname/IP address] (the hostname must be the same as the entry in the device’s Hostname field) Examples: |
In a client installation, a TCP/IP port is created for RAW and an LPR port is created for LPR.
|
|
|
|
|
|
|
|
|
|
|
|
|
In the following dialog, select the printer driver you want to use. Note the instructions for selecting the printer driver at the top of this page. Then, if you have installed the printer driver on a server and want to share it with the users, you can share the printer driver. If the driver has been installed locally on the workstation computer, no share required.
The installation of the driver is now complete. Note the printer settings described below.
Printing a test page is only successful if the login of the user logged in to the computer also already exists in IQ4docs.
|
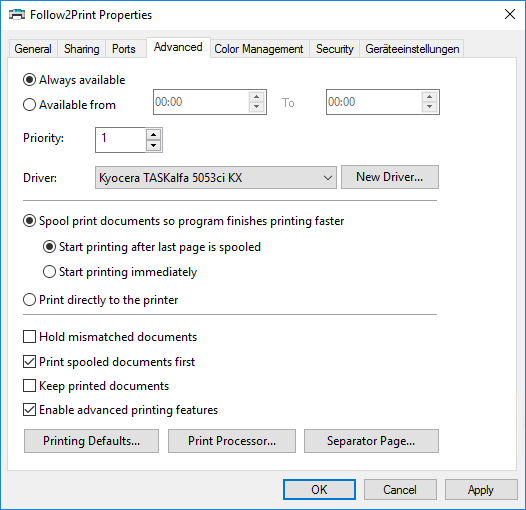
Open the Printer Properties and set the following on the Advanced tab:
Define further special settings for the printer driver (e.g. the equipment of the device on the Device Settings tab). |
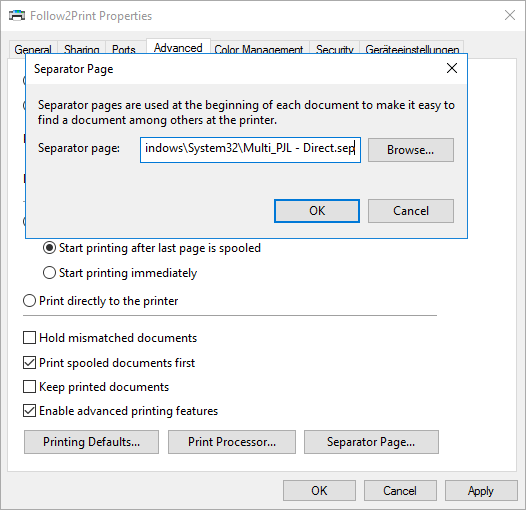
A separator page is normally a page which is automatically printed between two print jobs in order to separate them from one another. The separator page installed with IQ4docs in the system directory of the operating system does not contain any printable characters, so it will not be printed. Nevertheless, in this way, the username of the user who sent the print job is inserted into the data stream (or other functions that can be controlled via the separator page are executed). If the login name is already inserted into the data stream in another way and you do not want to execute separator page functions, it is not necessary to specify the separator page, see Separator page.
If the login name is not present (in the print data stream or in the IQ4docs database), the print job is automatically rejected by the IQ4docs system by default and is deleted.
When using Kyocera devices, use of the KX printer driver is recommended. In it, a device (the one with the highest equipment level in the IQ4docs system) should be selected and configured in the device settings. The universal driver is not recommended.
Pay special attention to the following settings of the KX driver.
| Setting | Description |
|---|---|
| Hard disk | Devices must be equipped with RAM disks if the hard disk functionality is to be used in the driver (without a RAM disk and an activated hard disk in the driver, it is not possible to print multiple copies of a print). Without hard disk functionality, the data stream will be considerably larger depending on the number of copies, resulting in an increased network load (but a RAM disk is not required in this case). The use of a RAM disk is recommended. |
To assign exactly one workflow to a printer port, create a print input in IQ4docs. Proceed as follows.
The print inputs for Raw (49500), LPR (default) and IPP (default) are created automatically during the installation process.
To open the web administration, enter http://<hostname>/webadmin in the web browser (where hostname corresponds to the server on which IQ4docs WebAdmin was installed).
In web administration, click Print > Print Inbox in the menu.
Now click on Add Spooler Port. Select which type of port you want to add. This depends on the type of port you have selected for the printer connection.
Raw ports cannot be created in a client environment, but are instead predefined by the client administrator. Select a workflow from the predefined workflows.
| Field | Description |
|---|---|
| Raw Port | Enter the port number you assigned when you connected the printer driver (default: 49500) |
| Workflow | Specify the print workflow to which the print jobs of this port can be routed. There can only be one port/workflow combination at a time. |
| Field | Description |
|---|---|
| LPR printer | Enter the queue name that you assigned when connecting the printer driver (e.g.: Default) |
| Workflow | Specify the print workflow to which the print jobs of this port can be routed. There can only be one LPR printer/workflow combination at a time. |
| Field | Description |
|---|---|
| IPP printer | Enter the name that you used in the URL when creating the IPP printer (for example: Standard). |
| Workflow | Specify the print workflow to which the print jobs of this port can be routed. There can only be one IPP printer/workflow combination at a time. |
With the correct configuration, the print jobs appear in the printer queue for a short time and then disappear again, but are not output immediately by the printer as before, but are stored with the IQ4docs PrintService. With the WebAdmin, the print is visible in the list of print jobs.
If the test page does not disappear from the printer queue or if an error is reported, please check the configuration of the printer port first and then check all print settings stored in the IQ4docs database (ports, print rights, login available etc.). Heed especially the hostname entries.