Editing Print Jobs
With the editing function you have the option of taking care of a forgotten setting on the device or of making a print job printable on a device where it normally cannot be printed.
Depending on the printer driver used and its description language (PCL 5c, PCL XL, KPDL...), some properties cannot be read from the data stream and are not displayed correctly in the Edit dialog, see Possible changes to a print job.
Depending on the administrator's system settings, properties of the print job can be changed (e.g. by a print rule) independently of the printer driver setting. Depending on the system settings, it might no longer be possible to change such properties (the button is then grayed out).
 The Back button takes you back to the dialog you came from.
 If a print job is not printable, an option (or several options) is marked with an exclamation point and a note is displayed in the info bar at the bottom of the screen. This is because the device cannot meet the requirements of the print job (for example, the print job is to be stapled and the device does not have a stapler). These settings must then be changed so that the print job no longer contains any properties that the device cannot handle.
The settings of a print job can be made in the WebClient or on the device in the Embedded Client. Changes are applied immediately (e.g. on the Embedded Client even if the print job is not printed) and saved permanently (a change in the WebClient is also visible in the Embedded Client, for example).
Which settings are possible in dependence on the driver and description language is described under Possible changes to a print job.
The possibilities depend very much on the device, its settings in the IQ4docs system and the printer driver used. In most cases, therefore, only some of the following properties can be changed.
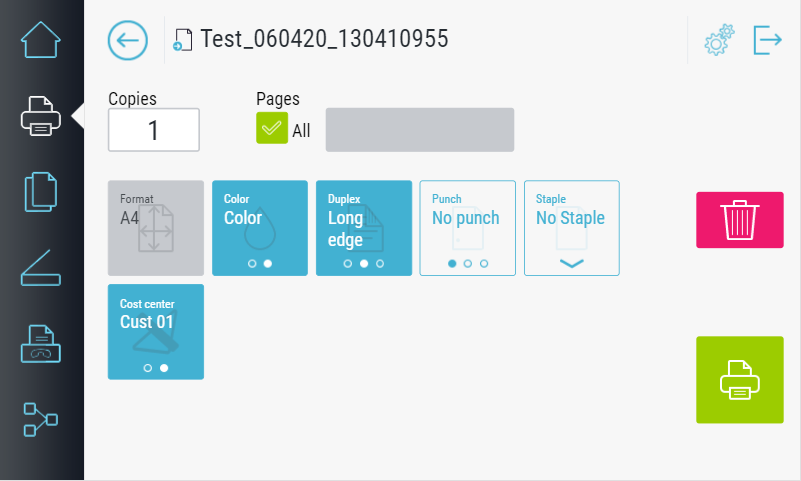
 In the list of print jobs, select the print job you want to modify and press the Edit button. The detail dialog for the print job opens (see above). The buttons represent the current setting status. Adjust the settings by pressing the respective button. The dot symbol on each button indicates how many switching options there are and which option is currently displayed:
 means that there are 3 switching options and the first one is currently displayed,
 means that there are 2 switching options, the second one is currently displayed,
 means that there are more switching options. A window opens in which you can select the desired option.

|
The set format is output for informational purposes. It can never be changed. |

|
|

|
|

|
Depending on the driver, 4 holes may be shown as 2 holes (if the data stream contains the information in a non-analyzable form). |

|
|
 If at least two cost centers are assigned to you for billing, the Cost Center button appears. Select the cost center to which the costs of the activity are to be charged.
Number of copies of the print job. The number of copies set in the driver is initially displayed here. To change the number of copies, enter the desired number.
You can subsequently specify which page range you want to output from the print job. For example, if a print job of 10 pages was sent, you can set it to print only pages 4 to 7. If a page range has already been entered in the driver, IQ4docs operates on the basis of the number of pages sent to the printing system (e.g., if pages 5-10 were selected in the driver, for IQ4docs, the document will have 6 pages; if a restriction to pages 2 to 3 is then made, this represents pages 6 and 7 from the original document).