My Print Jobs
If you have printed something to the print@me queue – i.e. the system does not print the job immediately but stores it temporarily until you request printing – you will see your print jobs in the list of print jobs.
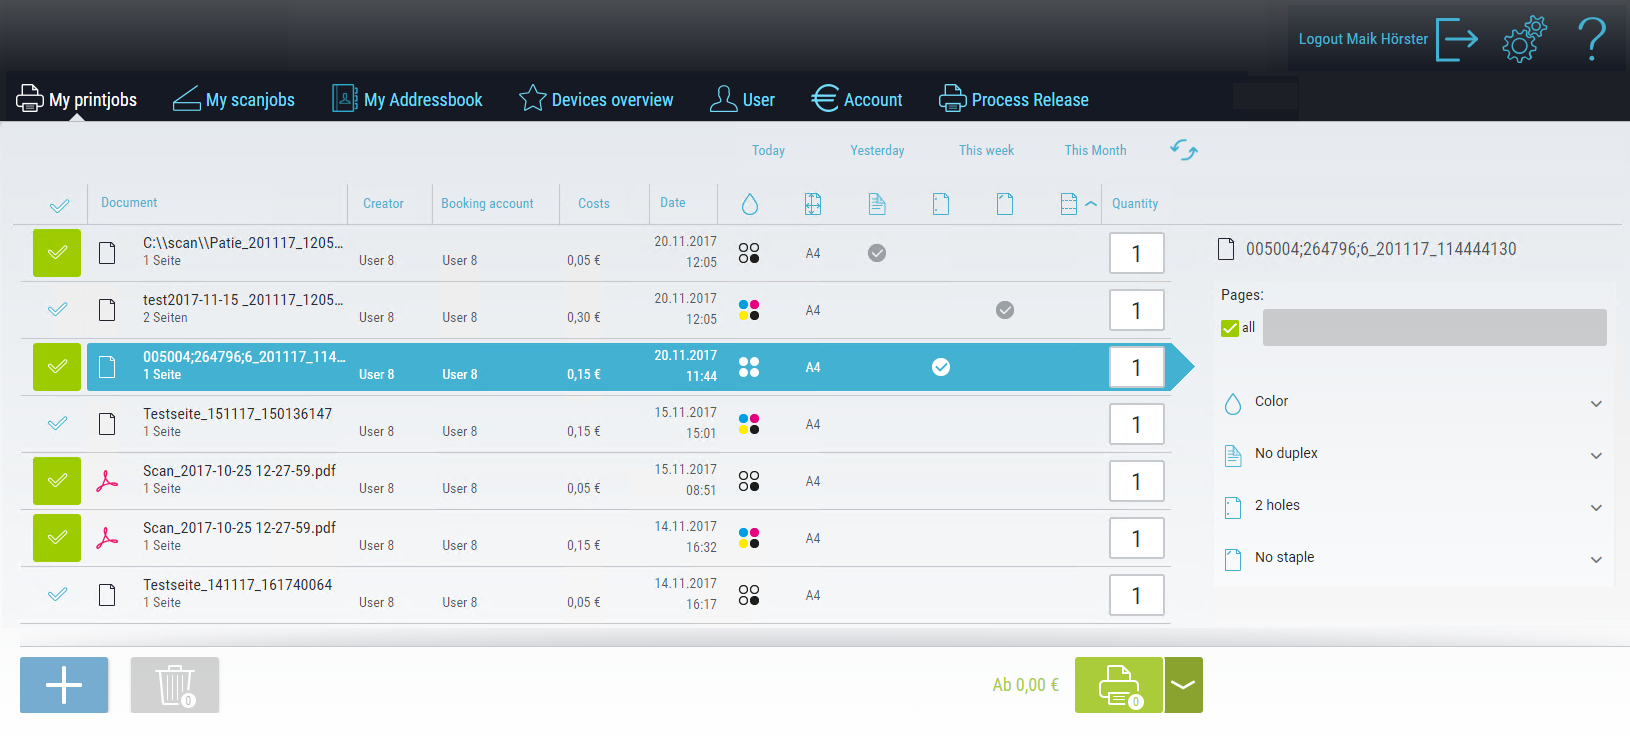
The My Print Jobs menu shows you your print jobs. The print jobs are sorted chronologically by default with the most recent print job at the top. You can change the sort order at any time by clicking on the desired column identifier. Another click changes the sort direction.
The view adapts to the size of the browser window. Depending on the width of the window, columns will be pushed together or disappear completely.
You can restrict the view of the print jobs by time periods to get a better overview of your print jobs.
In the WebClient, use the buttons Today, Yesterday, This Week and Last Week located above the list of print jobs to restrict the view. The active search filter is then highlighted. To see all print jobs again, click on the active search filter once again (highlighting disappears).
You can modify some properties of the marked (line of the print job highlighted in color) print job. Once a print job is highlighted in color, the print job details appear on the right side. You can change the values in the drop-down lists. Changes are applied immediately (the changed properties are then also visible on the device).
You can subsequently specify which page range you want to output from the print job. For example, if a print job of 10 pages was sent, you can set it to print only pages 4 to 7. If a page range has already been entered in the driver, IQ4docs operates on the basis of the number of pages sent to the printing system (e.g., if pages 5-10 were selected in the driver, for IQ4docs, the document will have 6 pages; if a restriction to pages 2 to 3 is then made, this represents pages 6 and 7 from the original document).
- Black and white - The image is created without color but with black and gray tones.
- Color - The image is created using black and color toner.
- No duplex printing - The paper is scanned on one side.
- Long side - Both sides of the paper are scanned, and the paper is turned on the long side (portrait).
- Short side - Both sides of the paper are scanned, and the paper is turned on the short side (landscape).
 The Delete button deletes all selected print jobs. The number of print jobs to be deleted is shown in a small font on the button.
Deleting the print jobs is done immediately and without prompting. The print jobs cannot be restored.
Print jobs have a configurable maximum runtime. After this time they are deleted automatically, see Workflow Settings.
 If WebPrint is set up in the IQ4docs system, a print job can be created using the + button. This must be a driverless printable file from the device.
For e-mail and WebPrint, these files are sent directly to the device. This means the devices must support direct printing of these file types. Currently the following file types can be used with IQ4docs:
- PDF (Portable Document Format)
- XPS (XML Paper Specification)
Note that there may be restrictions depending on the device manufacturer, file properties, and file type (e.g. for PDF files, the paper format might not be recognized by the device).
For more information, please contact your partner responsible for questions about devices.
The following file formats are supported for Office printing. These are not sent directly to the device, but are first converted into a PDF file by IQ4docs, which is then used as a print job.
- JPG (image format of the Joint Photographic Experts Group)
- TIFF (Tagged Image File Format)
- DOC, DOCX (Microsoft Office Word)
- XLS, XLSX (Microsoft Office Excel)
- PPTX (Microsoft Office PowerPoint)
When converting Office formats to PDF, there may be slight variances in the display.
The number of copies is preset with the value transmitted by the driver (number of copies is usually configurable in the driver). To change the number of copies of a print job, press in the number field at the end of the line. Enter the desired number of copies. The changed number is saved immediately and is still available after logging out (without having previously printed) and can be viewed and changed on the device and in the WebClient.
 Use the Print button to output print jobs to one of your favorite printers immediately (see Printing from the WebClient). The Print button is only active if you have at least one favorite printer (see Select favorites and direct printer).
The costs of the print jobs are only displayed if this has been activated generally (see Display Of Costs And Credits) and if you have at least one favorite printer (see Select favorites and direct printer).
The list view always displays the price of the device with the least expensive printing costs for this print job under Costs From (Devices can have different price lists, see Device List). The total cost of all print jobs is displayed at the Print button and in the menu for the other print functions.
The menu for printing from the WebClient shows the total of the costs for each favorite printer according to the price list assigned to the device (see also Printing from the WebClient).
 The Settings button takes you to your personal settings, where you can set the language. After logging in, the system automatically switches to the language you have set.
 To log out, you can press the Logout icon located in the upper right corner of each dialog. This will take you back to the default login screen (which one that is can be set under Set authentication methods).