The Document Check Module
The Document Check module triggers a check of the document in the WebClient. The workflow waits in this module until the processing of the document is finished in the WebClient. More information on setting up the document check can be found under Document review.
You can use variables in all input fields, see Variables.
The document review module can only process PDF files.
The module can occur several times in the workflow.
The module can be connected to all modules (this can result in nonsensical workflows).
No restrictive modules.
Continue: The user has pressed the Continue button  in the WebClient.
Discard: The user has pressed the Discard button  in the WebClient.
Variables are specified in several places in this module. The variables are filled in with the values specified or selected in the WebClient. The variable may already exist and be filled in before this module (e.g. by the Zone OCR, Barcode, QRCode module). In this case, the variable value is displayed already in the corresponding field during the document review in the WebClient or, for example, the category is selected automatically (in the case of a selection, the variable value must match exactly).
Here, enter a variable name in which the name of the selected classification is to be stored (e.g. Classification).
The name of the variable must not contain special characters. Allowed are small and capital letters (no umlauts or similar), numbers and the dot ".".
If the variable name is used in several places, all places can influence the variable value.
You can add as many classifications as you want using the Add Classification button (one of them can be selected in the WebClient). An empty classification area appears.
Name: Enter a name for the classification (e.g. Invoice). The variable that was specified as parent for the classification is filled in with this value.
Use Add Variable to add any number of variables for the classification. A variable is displayed in the WebClient as an input field. The input in the input field is saved as the variable value. Example: If you specify the variable name Invoice Number , an input field labeled Invoice Number is displayed in the WebClient. If the user now enters RN4711 in the field, this value is stored in the variable. You can output the variable value as for any variable with %InvoiceNumber% e.g. in a metafile or use it in a decision module.
A variable can be deleted again via the delete icon.
You can delete a classification using the Remove Classification button. All settings for this classification will be lost.
Variable: Here, enter a variable name in which the status is to be stored (e.g. Status).
You can add as many statuses as you want using the Add Status button (one of them can be selected in the WebClient). Enter a value that the user can select in the WebClient.
 Assign to the following processor: If you want the document to be processed by a specific user automatically, select the username from the drop-down list after entering the first letters of the name. Only this user will see the job in the WebClient under My Tasks. If the field remains empty, the document is displayed to the user who started the workflow (e.g. scanned it).
Allow Manual Assignment: This option allows the user to assign the document to another processor (if the option is not enabled, the button for assigning the document is not visible in the WebClient). In case of a transfer, the document disappears from the list of documents to be processed in the WebClient and is displayed for the selected user instead. In technical terms, this module is still executed in the workflow.
Keyword Filter: It is possible to form a group of processors by using keywords (all of which have the same keyword). If a keyword is specified in the keyword filter, the document can only be passed on to users in this group (the user who wants to pass on the document must also be part of this group, i.e. also possess the keyword). If the field remains empty, no restriction is active and the document can be passed to all users.
Sharing in this manner can only be done with users who have the user license option Document Check, see also Licensing.
You can notify the user to whom the document has been given.
| Field | Description |
|---|---|
| Notification active | Specify whether or not to send an e-mail for this event. If this setting is not available, the notification cannot be deactivated. |
| Type of notification | The e-mails can be sent in HTML or text format. In some places a message can also be sent as a push notification with IQ4docs Messenger, see also IQ4docs Messenger. The length of push notifications may be limited depending on the operating system. |
| Recipient | Specify one or more e-mail addresses (separated by semicolons) to which the e-mail should be sent. It is also possible to use the e-mail address stored with the user (%EMAIL%), see also Variables. If this field is not displayed, the e-mail notification automatically uses the e-mail address of the user executing the workflow (this field is not available for push messages). When testing the connection, the e-mail address of the user currently logged in to WebAdmin is then used. |
| Sender | Specify an e-mail address to be used as the sender of the e-mail. This is also the address that is used when the recipient of the e-mail clicks on Reply in the e-mail program. It is also possible to use the e-mail address stored with the user (%EMAIL%), see also Variables; this can be useful for some events, since the user who has encountered the problem can be contacted by e-mail. If this field is not displayed, the e-mail notification automatically uses the e-mail address of the user executing the workflow (this field is not available for push messages). When testing the connection, the e-mail address of the user currently logged in to WebAdmin is then used. |
| Language | Select the language in which the e-mails should be sent. |
| Subject | Specify the desired text to be used as the e-mail subject. |
| Message | Enter the desired message here. Depending on the type of notification, use plain text or HTML code here. If this field is not displayed, the text will be supplied in full from the message template. |
Send Test Notification sends a test message with the selected settings. For the test, the user data of the user who is currently logged in to the WebAdmin are used (if you make changes to the data of this user, you must log out and log in again in order for this data to be loaded). It might not be possible to resolve variables at this point because the workflow was not actually executed. When testing, also note the settings for the recipient and sender.
Load Defaults fills the fields for Recipient, Sender, Language and Subject with default settings - any values that may have been entered are replaced.
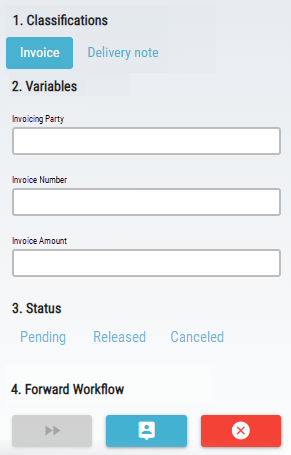 This is an example of the appearance of the processing area in the WebClient.
Two classifications were created (Invoice and Delivery Note). Three variables were created below the Invoice classification (Invoicing Party, Invoice Number, Invoice Amount).
Three statuses were created (Pending, Released, Canceled).
Changing the processor is allowed (middle button is visible).
The ImageService processes image data (e.g. from scans) and performs file format conversions, image optimization and the OCR function. It stores files in desired destination directories (depending on the module used, the rights of the user executing its application pool are used for this purpose). Its log file is Logs\ImageService.log.